It'a that time year again... FALL! Hayrides, corn mazes. Halloween... and literacy pumpkins. This year we chose to decorate our literacy pumpkin as Curious George. We used the book, "Follow That Hat!", as our inspiration, as well as my little stuffed Curious George. I borrowed the hat from my stuffed George to put over the pumpkin stem, and set the painted pumpkin on top of a glass container. I also lined the inside of the glass container with a piece of red paper that read, Curious George, in yellow letters (it was supposed to look like his shirt).
I think that it turned out really cute. My class loved it and they were so proud to have it on display in our school library. I must say, this is probably my most favorite pumpkin I have made with my classes so far... I mean, who doesn't love Curious George?
Our PTA at Crown Point is the absolute and total best! They did a most excellent job at showcasing Red Ribbon Week and bringing the drug free campaign to Crown Point.
We had "be on the right team" day and got to wear a t-shirt to support our favorite NFL team. I chose to show some love for Texas and my daddy and wore my Dallas Cowboys t-shirt...
We also had NERD DAY... because we are too smart to do drugs! I had a little too much fun dressing up as a nerd for my kiddos...
On Friday it was time to show our school pride and wear a Crown Point Elementary t-shirt. I was sporting my Crown Point Leadership shirt to show my Panther Pride...
... and as if all the themed days were not fun enough, we also got to decorate our doors for a little friendly competition between the grade levels. This year's theme for Red Ribbon Week was, "Life is a journey... travel drug free". This theme was a little tricky, but I decided to go with an alien decor and had each of the students sign their drug free pledge...
Turns out, our alien door decor was a total success... we won the door contest!!
A special THANK YOU to our PTA for all their hard work to make this week SUPER amazing!
We started off our week exploring the different states of matter... solid, liquid, and gas. During our science lab, I filled Ziploc bags with a solid object (toy car), a liquid (water) and a gas (air). We talked about how a solid object keeps its shape, a liquid takes the shape of its container, and a gas fills the space it is in. We passed the bags around and the students got to feel each of he bags, compare each of the states of matter, and turn and talk about the properties of matter they were exploring and observing.
As we continued our exploration on the different states of matter, I decided to let the students have some fun with this cotton ball experiment.
First, we filled one glass to the tippy-top with water, and filled another glass to the tippy-top with 30 cotton balls. Next, we made a prediction of how many cotton balls we could put in the glass of water before the water would begin to spill over the top of the glass. To show the students how easily the water could be displaced, I filled a smaller cup with water and put my fingers in it while the students watched the water spill over the top. After careful consideration, the class decided that we would only be able to put 8 cotton balls in the glass before the water would spill over.
Then the fun started... as I placed each cotton ball in the glass, the students started counting. It was so awesome to hear the disbelief in their voices as they got closer and closer to using all 30 cotton balls. When we put the 30th cotton ball in the glass, I swear I thought that our principal was going to come down to my classroom to see what all the screaming was about... lol! The students could not believe their eyes! All 30 cotton balls were in the glass of water and it never spilled over!
While we were putting the cotton balls in the glass, I made a quick video of our observations. The students got to observe that as the cotton ball was going in the water, air bubbles were coming up out of the water. The water was taking the place of the air that was in the cotton balls. We were then able to conclude that because the cotton balls were made mostly of air, and the air was being replaced by the water, that is why we were able to put all 30 cotton balls in the glass without having any water spill over.
To add a little visual learning to this experiment, I took a cup and filled it with toy dinosaurs. Then I slowly poured the water left in the cup I used to show the students how water gets displaced into the cup of dinosaur toys. The students watched the water fill all the spaces of air in between the dinosaurs. I heard about a dozen students say, "I get it now, Mrs. Kearson"... it was AHH-SOME!!
No dinosaurs were harmed while conducting this experiment... LOL!
Friday we started our module on Ancient Asian Civilizations. To introduce this module, I did a KWL chart with each of my classes. What is a KWL chart you ask? Well, KWL is an acronym for the following...
K = What I KNOW
W = What I WANT to know
L = What I LEARNED
It was really fun to see just how similar and different my two classes were. Some of their responses for what they already knew about Asia where too funny. Especially when one of my students said, "Mrs. Kearson, I know that all of the things we buy are made in China... China makes all our stuff for us". I also loved how my homeroom class wanted to know if Asia had beaches. Adorable!
Here are the KWL charts I made with each of my classes.
Once we finished our whole group KWL chart, the students wrote out three things on their own KWL chart that they already knew and wanted to know. After we have read several of our stories on Ancient Asian Civilizations, we will add what we learned. FUN!
This is a fun way to practice and master our alphabetizing skills during centers. The students use the ABC worksheet and Saxon alphabet strip (both pictured below) to alphabetize the weekly Saxon spelling words.
For this center, the students look at each letter on the alphabet strip beginning with "A" to see if there is a word on the spelling list that begins with that letter. The students then move on to the next letter in the alphabet, and so on until all 20 words are used. This is a great beginning strategy for the students to use when alphabetizing.
As the students work on this center with each week's Saxon vocabulary, the need for the alphabet strip becomes less and less, and the students are able to show mastery of this skill. I really like that they work on this in small groups and share their thinking with each other, rather than just copying what is modeled by me in a whole group lesson.
Next week we begin using our Saxon Phonics vocabulary words to write meaningful sentences in our ELA centers, as well as for homework.
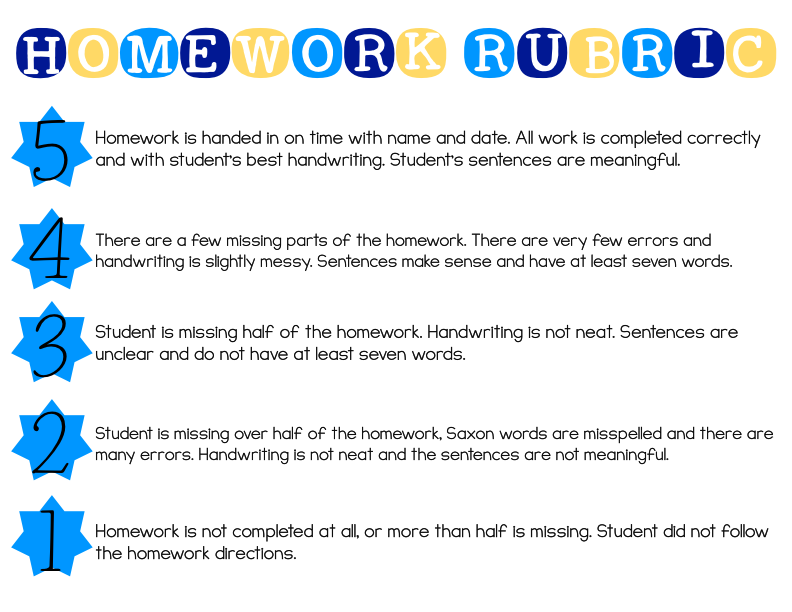
SO... What is a meaningful sentence you ask? A meaningful sentence is a sentence that has value to the reader. A meaningful sentence needs to make sense, begin with capitalization, and end with punctuation. A meaningful sentence should also paint a picture for the reader by using describing words, or adjectives, to give details. An example of a meaningful sentence is on the Weekly Homework sheet. I have also created a Homework Rubric to make sure your child knows what goals to reach with the homework writing.
Both the Weekly Homework sheet and the Homework Rubric will always be posted in the Newsletter tab of the blog for your reference and convenience.
Here is the Meaningful Sentences worksheet we will be using in centers. At the bottom is a writing rubric to check off and help your child to ensure that the sentences are meaningful.
Thank you for all you do to ensure your child's academic successes in second grade!
The second week of this school year we got to start our first science experiment... YAY! While exploring our Big Idea on the Process of Science, we learned all about what a scientist does... and the most important thing a scientist does is ask questions. After reading about how scientists asked the question, "How do we grow plants in space without soil?", we decided that for our first science question we would ask, "How do we regrow plants in space without seeds?". We hoped to be able to regrow celery from the head of the celery.
As we began the experiment, we were a class divided... half the class thought we could do it, while the other half thought the celery would rot before it regrows. We observed and documented our experiment over 10 days, and then celebrated our first scientific process of the school year by eating *Ants on a Log* (celery with peanut butter and raisins)... YUM!
Check out our pictures and journal entries to see our hypothesis, materials we used, our procedure, and just how successful our Great Celery Experiment was...
We had a "sweet" time in science today with our big idea on the properties of matter and exploration of reversible and irreversible change. After talking about all the things that represent reversible change, and all the things that represent irreversible change, I decided to surprise the students with a sweet science treat.
REVERSIBLE CHANGE...
First, I brought out a container filled with Skittles and we made our observations. We noticed that the Skittles were arranged and layered by color. We talked about the pattern of colors in the mason jar. After finishing our observations, I picked up the mason jar, flashed the class my best evil smile, and gave the jar a really good shake... GASP! All that hard work of separating two big bags of Skittles by color, and then carefully layering them in the mason jar for today's science was gone! Now, we had a hot mess of Skittles without any color pattern whatsoever. I asked the students if this was reversible or irreversible change. The answer was unanimous... REVERSIBLE CHANGE! The students explained to me that I could pour the Skittles out, separate them by color (again), and then layer them in the mason jar. They were absolutely correct!
IRREVERSIBLE CHANGE...
Next, I took a few of the Skittles and dropped them into a glass of water. We observed what happened to the Skittles over the next several minutes. The colors from the Skittles were beginning to spread out into the water, and the Skittles were turning white as the colors dissolved away from them. Once again, I asked the students if this was reversible or irreversible change... and once again, the answer was unanimous... IRREVERSIBLE CHANGE! The students explained to me that I could not remove the colors from the water, put the colors back on the Skittles, and then make the Skittles and water like they were before I dropped the Skittles into the glass of water. Spot on! I couldn't be prouder of my second grade scientists.
Of course, once we were done with our exploration of reversible and irreversible change, we got to enjoy our sweet science treat... the Skittles.
What better way to experiment with force and motion than with popsicle stick catapults and pom poms!
*AND*... why make a single launcher when we can make a DOUBLE launcher to DOUBLE our fun!! This was literally the most fun we have had in science lab so far this year... and we have had some crazy major fun.
We used popsicle sticks, bottle caps, glue, rubber bands, and pom poms. We made our catapults during science lab yesterday, and got to spend all of today's science lab launching pom poms and having an absolute total blast.
My second graders had an absolute blast making ghost rockets on Mad Scientist Day!
First... we used black Sharpies to decorated our film canisters to look like ghosts. SPOOKY!
Then... we mixed some water (about 1/3 of the film canister) and cornstarch (about 1/2 tsp) together in the ghost film canisters.
Last... we went outside (very important to do this outside), put a 1/4 piece of an Alka Seltzer tab in the film canister, put the top on the canister, and turned it top side down onto the ground.